As winter approaches across the United States, thousands of car owners perform a familiar weekend ritual to shield their expensive alloy wheels from harsh road salt, freezing temperatures, and corrosive urban grime. They spend hours meticulously cleaning, masking off tires, and applying a highly popular, flexible layer, resting easy under the assumption that this matte finish creates an impenetrable armor against the elements. It is a visually appealing, cost-effective driveway modification that has dominated automotive enthusiast forums for well over a decade, promising top-tier defense against the harshest seasonal conditions.
However, automotive metallurgy experts are now warning that this exact protective measure is secretly destroying wheels from the inside out. Instead of deflecting harsh winter elements, microscopic breaches in this ubiquitous coating actually draw in saline water, creating a toxic micro-climate directly against the bare metal. What begins as a stylish weekend project quickly transforms into a hidden, accelerated decay process that compromises the structural integrity of your expensive rims long before you even notice the first exterior blister.
The Illusion of Protection and the Enthusiast’s Mistake
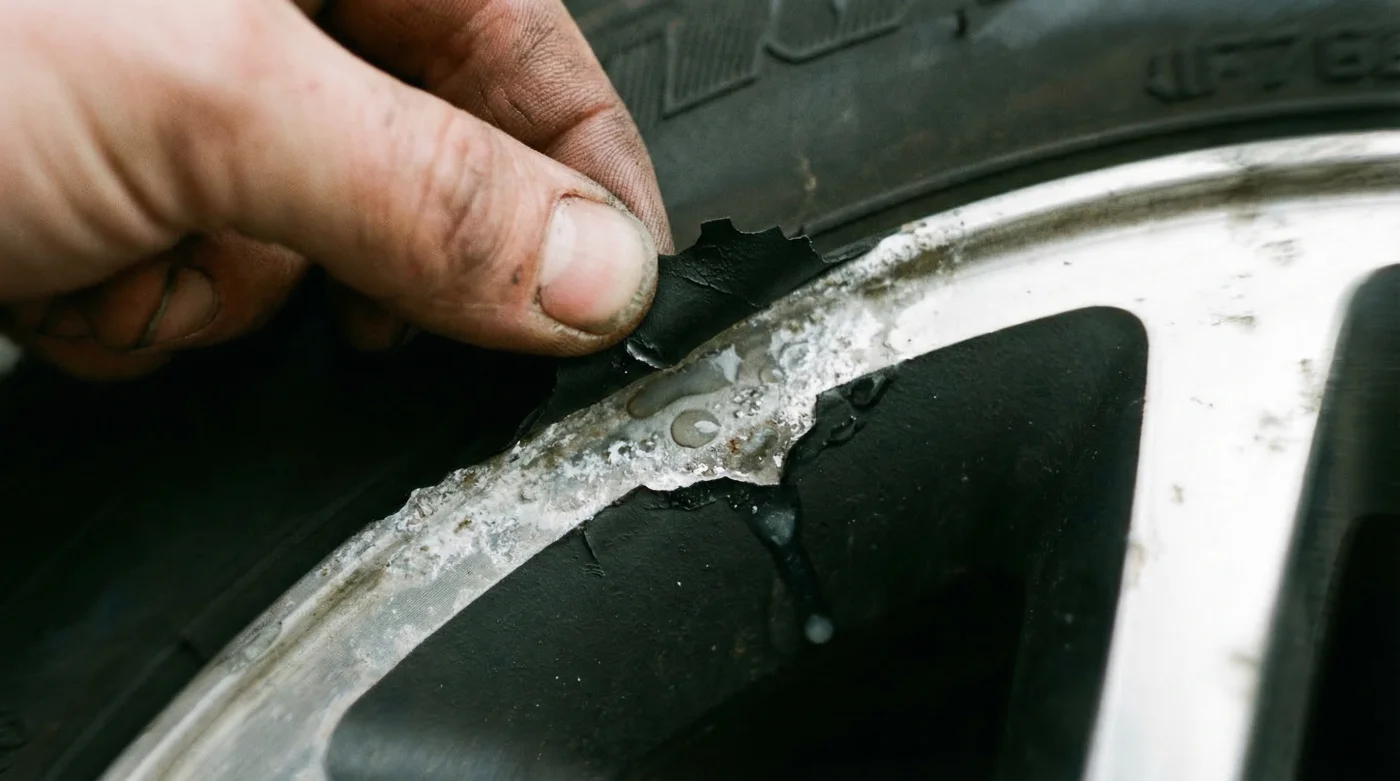
For years, drivers have utilized Plasti Dip spray as a dual-purpose tool: to temporarily change the color of their wheels and to act as a sacrificial barrier against winter road conditions, particularly in the salt-heavy Rust Belt. The logic seems sound on the surface. Rubber naturally repels water, therefore a rubberized spray should keep moisture away from sensitive alloy surfaces. Unfortunately, this logic fundamentally misunderstands the real-world durability of liquid vinyl under extreme kinetic stress. Highway debris, automatic car washes, and basic tire flex create microscopic tears in the coating. Experts advise that these invisible fissures do not cause the material to peel off immediately; instead, they act as one-way valves that trap caustic elements against the wheel.
| Target Audience / Driver Profile | Application Goal | Winter Exposure Level | Hidden Structural Risk Benefit vs Drawback |
|---|---|---|---|
| The Track Day Enthusiast | Aesthetic color swaps to match race livery without permanent commitment. | Low to Moderate. Mostly brake dust accumulation rather than severe road salt. | Benefit: Easy visual customization. Drawback: High brake temperatures melt the spray, trapping corrosive dust. |
| The Daily Commuter | Maximum winter protection against snow, ice, and chemical de-icers. | Extreme. Daily exposure to calcium chloride brine and rock salt. | Benefit: Cheap seasonal application. Drawback: Severe galvanic rot hidden under the rubber layer. |
| The Show Car Owner | Preservation of highly polished custom alloys during transit or off-season storage. | Low. Kept in climate-controlled garages. | Benefit: Protects from minor garage scratches. Drawback: Condensation trapped underneath can cause dulling over time. |
While these varying driving habits dictate the sheer speed of the decay, the underlying microscopic reaction remains identical across every single vehicle on the road.
The Science of Trapped Brine and the Greenhouse Effect
Once a tear forms in the Plasti Dip spray, the vehicle’s rotational force and simple capillary action aggressively pull water, magnesium chloride, and sodium chloride underneath the rubber membrane. Because the outer layer is predominantly intact, the moisture cannot evaporate back into the atmosphere. Studies confirm that this creates an extreme greenhouse effect against the bare alloy surface. When you add the ambient heat generated by heavy braking—often pushing inner wheel temperatures well above 250 degrees Fahrenheit—the trapped brine mixture turns into a highly reactive corrosive paste.
The technical term for this destruction is galvanic corrosion, a process that rapidly breaks down automotive metals. The rubber coating effectively holds the corrosive agents tightly against the metal, preventing rain or regular high-pressure car washes from flushing the salt away. Over several weeks, this environment breeds severe aluminium oxidum (aluminum oxide) pitting, eating into the barrel of the wheel.
| Temperature / Kinetic State | Chemical Reaction Trigger | Expected Rate of Alloy Decay |
|---|---|---|
| Below 32 Fahrenheit (Freezing) | Salt brine is dormant but trapped against the metal structure. | Slow. Minimal active oxidation occurs while frozen. |
| 60 – 150 Fahrenheit (Standard Driving) | Moisture liquefies; capillary action spreads the salt mixture. | Moderate. Surface pitting begins to etch the clear coat. |
| 180+ Fahrenheit (Heavy Braking) | Brine bakes onto bare alloy; rapid galvanic corrosion engages. | Severe. Deep structural metal loss and active bubbling occur rapidly. |
- Subaru Outback drivetrains shatter when owners mix different replacement tire brands
- 3M adhesive wheel weights secretly detach during automated car wash cycles
- Magic Eraser sponges microscopically scratch protective clear coats off alloy wheels
- AAA roadside assistance crews officially stop plugging punctured tires on highways
- Goodyear quietly discontinues popular standard passenger tires favoring electric vehicle compounds
- Spongy or Soft Spots = Capillary action has drawn moisture behind the coating, causing localized delamination of the spray from the alloy.
- White Powdery Dust near Tears = Active aluminium oxidum formation; the bare metal is currently being eaten away.
- Bubbling near the Valve Stem = Trapped air and moisture expanding under brake heat, indicating deep surface rust around the tire bead.
- Flaking Rim Edges = Complete failure of the protective barrier, allowing salt to aggressively attack the air seal of the tire.
Understanding these hidden chemical triggers highlights exactly why visual inspections must go far beyond a simple glance at your wheels in the driveway.
Diagnosing the Hidden Rot Before Structural Failure
Catching the damage before it destroys the structural integrity of the wheel requires a proactive, tactile inspection protocol. Do not rely solely on your eyes; the thick, matte finish of Plasti Dip spray is notoriously excellent at hiding the topographical changes caused by early-stage pitting. Experts recommend washing the wheels thoroughly and running your bare fingers heavily along the inner barrel, the outer lip, and the spokes every 500 miles during the winter months. If you feel any uneven ripples, or if the rubber depresses like a medical blister, caustic moisture has breached the perimeter.
Another critical diagnostic zone is the lug nut housing. Because steel torque wrenches and pneumatic impact guns frequently score the sides of the lug pockets during routine tire rotations, these areas are ground zero for immediate moisture intrusion. If you routinely blast your wheels with a commercial pressure washer at a close distance of under 12 inches, you are likely forcing microscopic water droplets straight into these compromised seams, bypassing the rubber barrier entirely.
Identifying these insidious warning signs is an essential first step, but knowing how to safely and permanently transition away from this flawed coating system is what will ultimately save your rims.
The Professional Progression Plan for Wheel Protection
Removing degraded Plasti Dip spray that has already bonded with rough aluminum oxide can be a painstaking nightmare. Avoid using sharp metal scrapers or highly acidic wheel cleaners, as these will simply worsen the microscopic pitting and scratch the remaining factory clear coat. Instead, you must apply a dedicated citrus-based solvent. Liberally spray the solvent, allow it to dwell for exactly 10 minutes at an ambient temperature of at least 70 degrees Fahrenheit, and gently agitate the liquefied rubber with a plush microfiber towel. Once the bare alloy is exposed, you must safely neutralize the salt deposits using an iron-decontamination spray before applying a legitimate protective barrier.
| Protection Progression Phase | What to Look For (The Quality Standard) | What to Avoid (The Failures) |
|---|---|---|
| Phase 1: Safe Removal & Prep | Citrus-based adhesive removers, pH-neutral iron fallout removers, clay bars. | Wire brushes, acidic brake dust cleaners, heavy metal scrapers. |
| Phase 2: True Chemical Bonding | 9H Ceramic Wheel Coatings containing silicon dioxide (SiO2). Must cure for 24 hours. | Any aerosol rubberized sprays, standard carnauba waxes (melts at high heat). |
| Phase 3: Long-Term Preservation | Routine maintenance with SiO2 boosted detail sprays, soft bristle wheel brushes. | Drive-through automated washes with harsh alkaline chemicals. |
By moving past outdated DIY hacks and understanding the underlying chemistry of true surface protection, you secure both the aesthetic appeal and structural integrity of your vehicle for years to come.
Elevating Your Automotive Standards and Securing the Road Ahead
The wider automotive community is slowly waking up to the harsh reality of temporary rubberized coatings. While they remain fantastic, low-stakes tools for creating custom garage wall art, protecting tool handles, or temporarily blacking out a plastic grille badge, they have absolutely no business shielding critical load-bearing components from severe winter weather. True wheel protection relies on deep chemical bonding—like professional-grade ceramics or true poly-silazane liquid coatings—that absolutely cannot tear, trap moisture, or hide dangerous corrosion from the driver.
Ultimately, true automotive care requires abandoning temporary aesthetic illusions in favor of permanent, scientifically validated solutions that keep your wheels safely turning.