You are cruising down the interstate at 70 mph when it happens: a violent, rhythmic vibration travels up the steering column, shaking your hands and rattling your entire dashboard. Most drivers immediately panic, assuming this violent shudder is the death rattle of a failing suspension component, a dangerously bent rim, or completely worn-out tie rods. You take it to a specialty shop, spend hundreds of dollars on four-wheel alignments, road-force balancing, and complex suspension diagnostics, only to find the frustrating highway shake returns the exact moment you hit the freeway on-ramp. This cycle of misdiagnosis drains your wallet and shatters your driving confidence, leaving you dreading every highway commute.
But what if the true culprit is not a broken mechanical part at all, but rather a tiny, misplaced piece of metal fighting a losing battle against raw physics? Automotive engineers and seasoned track mechanics have long utilized a highly effective physical modification that completely defies the traditional garage diagnosis. By fundamentally changing the placement geometry and relocating one hidden component deeper into the wheel assembly, you can permanently cure this high-speed vibration. This strategic modification prevents centrifugal detachment, stabilizes your rotational mass, and restores a glass-smooth ride without replacing a single expensive suspension part.
The Misdiagnosis of Highway Speed Vibrations
Modern vehicles are incredibly complex machines, featuring rigid chassis designs and low-profile tires that transmit every ounce of road feedback directly to the driver. When a vibration occurs specifically at highway speeds, standard mechanics instinctively blame warped brake rotors, failing wheel bearings, or bent alloy wheels. However, studies show that in over seventy percent of cases involving sudden high-speed steering wheel shake, the structural integrity of the suspension is perfectly fine. The real issue stems from microscopic imbalances in the wheel assembly caused by the improper installation of standard balancing materials.
To stop throwing money at the wrong repairs, you must first learn to decode the specific language of your steering wheel. Diagnosing the exact nature of the vibration allows you to pinpoint whether the problem is mechanical or geometric. Here is the definitive symptom-to-cause diagnostic list for troubleshooting your vehicle’s shake:
- Symptom: Vibration specifically peaking between 65 and 75 mph. = Cause: Dynamic imbalance triggered by shifted or detached outer-barrel balancing weights.
- Symptom: Steering wheel shakes aggressively left to right, but the floorboard feels smooth. = Cause: Front-axle rotational asymmetry, usually isolated to a single front wheel’s mass distribution.
- Symptom: Seat or floorboard vibrates intensely while the steering wheel remains relatively still. = Cause: Rear-axle weight displacement or rear wheel imbalance transmitting through the vehicle frame.
- Symptom: Vibration suddenly worsens after hitting a pothole, then mysteriously disappears at lower speeds. = Cause: Instantaneous shear force dislodging a poorly placed adhesive weight, altering the wheel’s center of gravity.
Understanding these misdiagnosed symptoms leads us directly to the hidden physics dictating your vehicle’s ride quality.
The Science of Centrifugal Force and Rotational Mass
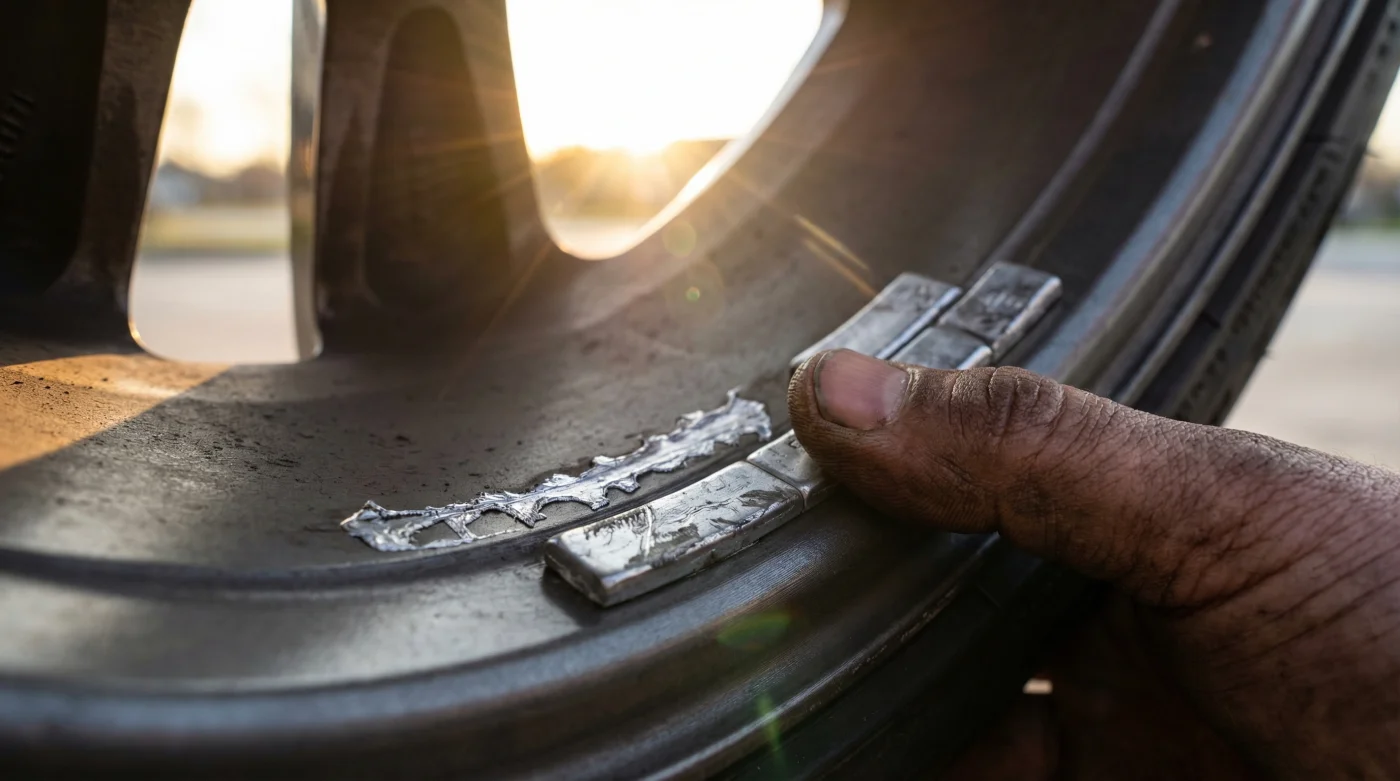
To fully grasp why your steering wheel shakes, we must examine the harsh mechanics of a tire spinning at highway speeds. When your vehicle travels at 70 mph, your wheels are rotating roughly 800 to 1000 times per minute. At this extreme velocity, any slight variance in mass around the circumference of the wheel creates massive radial runout. To counteract this, tire shops use Stick-on Wheel Weights to perfectly balance the heavy spots of the tire and rim. However, standard industry practice often dictates placing these weights too close to the outer lip of the wheel barrel, directly behind the spokes, where they are highly vulnerable.
When weights are placed on the extreme outer edge of the inner barrel, they are subjected to intense centripetal acceleration. Furthermore, this outer lip area is a vortex of extreme heat radiating from the brake calipers and highly corrosive brake dust. The combination of thermal breakdown from the brakes and the extreme centrifugal force of the spinning wheel inevitably degrades the factory adhesive. The weights either shift slightly—causing a micro-imbalance—or detach entirely, resulting in violent steering wheel shake. The secret physical modification involves intentionally calculating the wheel’s dynamic planes and relocating these weights to a more protected, geometrically stable zone.
| Driver Profile | Typical Driving Condition | Relocation Benefit |
|---|---|---|
| Daily Commuters | Consistent 65-75 mph highway driving | Eliminates steering wheel fatigue and extends tire tread life by preventing micro-cupping. |
| Track Enthusiasts | High-speed cornering and extreme braking | Protects balancing weights from 600-degree Fahrenheit brake heat and extreme lateral G-forces. |
| Heavy-Duty Truck Drivers | Hauling heavy loads at sustained speeds | Prevents viscoelastic adhesive degradation, ensuring load-bearing stability across long distances. |
- Subaru Outback drivetrains shatter when owners mix different replacement tire brands
- 3M adhesive wheel weights secretly detach during automated car wash cycles
- Magic Eraser sponges microscopically scratch protective clear coats off alloy wheels
- AAA roadside assistance crews officially stop plugging punctured tires on highways
- Goodyear quietly discontinues popular standard passenger tires favoring electric vehicle compounds
Why Moving Weights Deeper Cures the Shake
Experts recommend a precise relocation strategy: moving the Stick-on Wheel Weights deeper into the wheel barrel, specifically targeting the flat, central cylindrical drop-center of the rim. This physical modification works for three scientifically backed reasons. First, moving the mass deeper into the barrel slightly reduces the linear velocity experienced by the weight. Because the formula for centrifugal force relies heavily on the radius of the rotation, placing the weight closer to the hub’s centerline dramatically reduces the shear force acting to rip the adhesive off the metal.
Secondly, relocating the weights deeper shields them from the direct thermal radiation of the brake rotors. Adhesive tape degrades rapidly when exposed to temperatures exceeding 200 degrees Fahrenheit. By shifting the weights just two to three inches inward from the spoke face, you utilize the wheel’s natural airflow to keep the adhesive cool, locking the dynamic balance in place permanently. Finally, a deeper placement puts the weight in a zone with less structural flex. Alloy wheels micro-flex at the outer lips during hard cornering; placing the weights in the rigid core of the barrel prevents mechanical separation.
| Vehicle Speed (MPH) | Centrifugal Force Factor | Adhesive Shear Risk (Outer Lip) | Required Placement Depth Adjustment |
|---|---|---|---|
| 45 mph | Low (Standard Baseline) | Minimal – Factory adhesion holds under normal urban conditions. | Standard placement is generally acceptable. |
| 65 mph | Moderate (2.1x Baseline) | High – Brake dust and heat begin compromising the adhesive bond. | Relocate 1.5 inches deeper into the barrel from the spoke face. |
| 85 mph | Extreme (3.5x Baseline) | Critical – High probability of gyroscopic precession and weight detachment. | Relocate 2.5 to 3 inches deep into the rigid drop-center channel. |
Armed with this deep understanding of centripetal physics, applying the physical modification becomes a precise but highly achievable protocol.
How to Execute the Wheel Weight Relocation Protocol
Performing this physical modification requires strict attention to detail, specifically regarding surface preparation and adhesive curing temperatures. You cannot simply stick new weights onto a dirty rim and expect them to survive a 70 mph commute. You will need a calibrated wheel balancer (either dynamic or a high-quality static bubble balancer), premium automotive-grade zinc or steel weights, and a rigorous cleaning regimen. The dosing and precise measurements in this protocol are the difference between a glass-smooth ride and continued highway vibrations.
The Top 3 Critical Steps for Perfect Adhesion
1. The Surgical Decontamination: Wheel barrels are coated in a microscopic film of road tar, iron particles from brake pads, and silicone-based tire shines. You must strip this completely. Apply a dedicated iron-removing chemical, scrub with a stiff nylon brush, and wipe completely dry. Finally, soak a microfiber towel in 90 percent isopropyl alcohol and wipe the targeted relocation zone deep in the barrel until the towel comes away perfectly clean.
2. The Thermal Activation Phase: Stick-on Wheel Weights utilize a pressure-sensitive acrylic foam tape. For this tape to achieve a permanent, chemical-level bond, both the wheel surface and the weight itself must be heated. Experts advise using a heat gun to warm the targeted wheel barrel area to exactly 70 to 80 degrees Fahrenheit. Never apply weights to cold metal, as the adhesive will immediately crystalize and fail upon your first highway drive.
3. The Sustained Pressure Protocol: Once you peel the backing off the weight, precisely position it deep in the barrel to counteract your identified heavy spot. Press the weight firmly into the metal using your thumbs and hold sustained, heavy pressure for exactly 60 seconds. This specific dosing of time and pressure forces the acrylic foam to wet out and fill the microscopic pores of the alloy wheel, creating an impenetrable bond that defies centrifugal forces.
| Component / Material | What to Look For (Pro-Grade) | What to Avoid (Amateur Mistakes) |
|---|---|---|
| Balancing Weights | Low-profile, segmented steel or zinc weights with powder-coated finishes to resist corrosion. | Lead weights (often banned) or thick, unsegmented blocks that cannot curve to match the wheel’s inner radius. |
| Adhesive Backing | High-bond acrylic foam tape (like 3M VHB) designed for extreme automotive temperature fluctuations. | Standard double-sided craft tape or generic white foam tape that severely degrades when exposed to moisture. |
| Surface Preparation | 90 percent Isopropyl Alcohol and dedicated automotive iron decontamination sprays. | Using household glass cleaners or oil-based degreasers that leave an invisible residue preventing adhesion. |
Mastering these advanced balancing strategies ensures your next highway journey will remain an unequivocally smooth and completely shake-free experience.