Picture this: You are inspecting your vehicle before a 500-mile road trip, and you spot a tiny, seemingly harmless nick on the outer sidewall of your front tire. While a massive gash would necessitate an immediate tow to a mechanic, superficial peeling often leaves drivers in a state of paralyzing indecision. Should you proactively spend $200 on a new replacement tire, or simply cross your fingers and risk a catastrophic highway blowout? Ignoring the issue entirely allows microscopic air leaks to form and invites hazardous road moisture to infiltrate the casing, creating a ticking time bomb of internal corrosion.
Fortunately, automotive engineers and seasoned mechanics rely on an extraordinarily specific habit to mitigate this exact risk, and it does not involve expensive vulcanizing kits or specialized equipment. By utilizing a common, inexpensive desk drawer item, you can create an impenetrable waterproof barrier that halts microscopic air leaks and entirely prevents moisture from rusting the tire’s internal steel belts. The secret lies in a highly specific chemical layering technique that stabilizes the compromised rubber instantly.
The Anatomy of a Sidewall Defect (And Why It Is Dangerous)
When tire rubber degrades or suffers minor abrasion from daily curb rub, the structural integrity of the tire’s outer casing is incrementally compromised. The sidewall is the highest-flexing zone of your vehicle’s foundation, meaning even tiny imperfections are constantly stretched and compressed at highway speeds. To diagnose whether your tire is a safe candidate for this at-home preservation method, you must first understand the strict relationship between the visible damage and the underlying threat.
- Symptom: Superficial peeling or flaking rubber. Cause: Low-speed curb abrasion, improper parallel parking angles, or advanced UV degradation from direct sunlight.
- Symptom: Microscopic bubbling when soapy water is applied to the nick. Cause: Porous rubber channels allowing slow, persistent air permeation from the inner pneumatic chamber.
- Symptom: Faint orange or brown discoloration inside the deepest part of the nick. Cause: Moisture reaching the internal steel belts, initiating dangerous oxidation and irreversible rust.
Before the damage reaches the catastrophic oxidation stage, experts advise applying an immediate polymer barrier to seal the vulnerability and restore surface integrity.
The Cyanoacrylate Solution: Transforming a Desk Staple into Armor
The hero of this automotive rescue mission is standard Super Glue, an industrial formulation scientifically known as cyanoacrylate. When layered precisely over minor sidewall nicks, this fast-acting adhesive acts as a synthetic, impenetrable scab. It creates a rigid yet adaptable waterproof seal that binds the torn rubber flap back to the main tire casing, permanently halting further peeling or tearing. More importantly, it creates an absolute barrier against driving rain, freezing snow, and highly corrosive winter road salt.
| Damage Profile | Target Vehicle User | Benefit of Cyanoacrylate Application |
|---|---|---|
| Superficial 2mm Sidewall Flap | Daily Commuters | Prevents the loose flap from catching air and tearing further at highway speeds. |
| Porous Micro-Abrasions | Long-Distance Travelers | Halts microscopic air leaks, stabilizing tire PSI for optimal gas mileage and handling. |
| Minor Cosmetic Curb Rash | City Drivers | Blocks harmful UV rays and chemical road salt from accelerating local rubber rot. |
Understanding exactly how this chemical compound interacts with commercial tire rubber is the crucial next step to preventing premature tire failure.
The Science of Elastomeric Bonding
Unlike traditional wood glues, which rely on evaporation, or slow-curing epoxies that require two-part mixing, Super Glue cures through an exothermic chemical reaction. This unique reaction is triggered by the ambient moisture present in the air and the microscopic water molecules on the tire rubber itself. This rapid polymerization process creates incredibly strong, long-chain plastic molecules that physically weave into the microscopic pores of the tire sidewall, locking the synthetic rubber matrices together.
| Technical Parameter | Specification / Dosage | Scientific Mechanism |
|---|---|---|
| Ideal Application Temperature | 50 to 85 Degrees Fahrenheit | Ensures optimal fluid viscosity for capillary action into rubber micro-fissures. |
| Adhesive Volume Limit | Maximum 0.5 milliliters per layer | Prevents brittle pooling; forces the adhesive to cure as a thin, flexible membrane. |
| Complete Curing Time | 4 to 6 Hours Minimum | Allows polymerization chains to reach maximum cross-linking tensile strength. |
- Subaru Outback drivetrains shatter when owners mix different replacement tire brands
- 3M adhesive wheel weights secretly detach during automated car wash cycles
- Magic Eraser sponges microscopically scratch protective clear coats off alloy wheels
- AAA roadside assistance crews officially stop plugging punctured tires on highways
- Goodyear quietly discontinues popular standard passenger tires favoring electric vehicle compounds
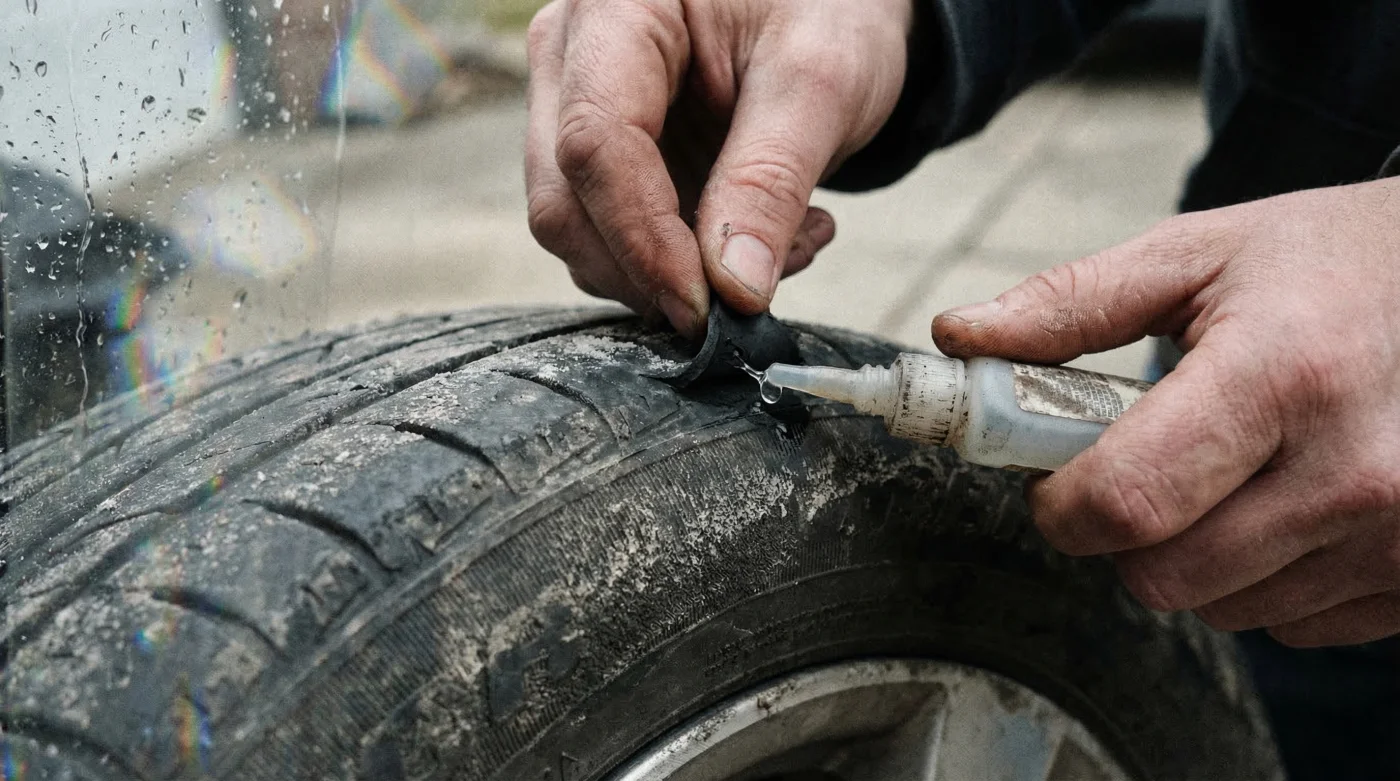
The Step-by-Step Application Protocol
To achieve professional-grade results that will not peel off during your next drive, you must treat the damaged tire sidewall like a sterile surgical site. Chemical and particulate contamination is the absolute enemy of successful cyanoacrylate bonding.
Step 1: Chemical Decontamination
Clean the nicked area using a lint-free microfiber cloth and 91% isopropyl alcohol. Scrub vigorously to remove lingering silicone tire shine, iron brake dust, and oily road residue. Pull the rubber flap back gently to clean the inner crevice as well. Allow the treated surface to air dry completely for exactly 3 minutes.
Step 2: The Foundation Layer
Apply exactly 2 to 3 drops of liquid Super Glue deep into the innermost crevice of the rubber nick. Using a clean wooden toothpick, spread the adhesive evenly across the exposed inner rubber casing to ensure full coverage. Press the torn rubber flap down firmly against the casing and hold it under constant thumb pressure for exactly 60 seconds to initiate the primary bond.
Step 3: The Cap Seal
Once the flap is structurally secured and the initial cure is complete, apply a secondary surface layer of adhesive (roughly 0.25 to 0.5 milliliters) directly over the exterior seam. Use the toothpick to smooth it out flat. This acts as the final waterproof shield against road moisture and high-pressure automated car washes. Allow the vehicle to sit in a dry, temperate environment for at least 4 hours before driving.
Selecting the absolutely correct formulation of adhesive for this procedure is the final critical step to ensure your repair withstands intense highway friction.
Ensuring Quality: Not All Adhesives Are Created Equal
While the heavily discounted dollar-store variety might suffice for fixing a broken household coffee mug, automotive rubber repair requires specific industrial-grade chemical properties. You need an adhesive that offers extreme tensile strength while retaining a microscopic degree of flexibility to survive the relentless rotational forces of a tire spinning at 75 miles per hour over uneven asphalt.
| Component / Feature | What to Look For | What to Avoid |
|---|---|---|
| Chemical Base | 100% Ethyl Cyanoacrylate | Water-based craft glues, standard polyvinyl acetate, or solvent-based rubber cements. |
| Viscosity Rating | Medium-Gel formulas (prevents dripping down the tire profile) | Ultra-thin, watery liquids that run off onto the wheel rim before fully curing. |
| Curing Additives | Rubber-toughened or impact-resistant formulations | Standard brittle, fast-dry formulas that will rapidly crack and flake under tire flexion. |
Equipped with the proper high-quality adhesive and technical knowledge, you can confidently address minor tire imperfections before they evolve into dangerous automotive emergencies.
Final Considerations for Highway Safety
It is absolutely imperative to maintain a strict boundary between a superficial cosmetic nick and catastrophic structural damage. If your sidewall nick is deep enough to reveal white nylon casing cords, braided steel wires, or if it causes the sidewall to bulge outward, do not attempt this repair. In those scenarios, no amount of Super Glue will save it; that tire is structurally compromised and requires immediate, professional replacement to prevent a lethal blowout. However, for minor, surface-level cosmetic damage, this simple desk drawer hack is an incredibly effective, science-backed method for extending the life of your tire. By actively halting microscopic air leaks and permanently sealing out moisture, you are directly preventing the internal oxidation of the steel belts, ensuring your vehicle remains safe, stable, and completely road-ready for the thousands of miles ahead.