You invest thousands of dollars into premium alloy wheels, religiously wash off winter road salt, and meticulously apply high-end sealants, yet a sinister creeping rot still destroys your rims from the lip inward. For decades, drivers have blamed harsh chemical cleaners, acidic rain, or inevitable wear and tear for bubbling clear coats and massive rim corrosion. However, experts are now sounding the alarm on an outdated, hidden culprit that operates right under your nose—a standard practice at almost every tire shop that secretly compromises the structural integrity of your expensive wheels the moment you drive off the lot.
This silent destroyer contradicts the long-held belief that all wheel balancing methods are entirely harmless and standard across the industry. By relying on a primitive, forceful clamping mechanism, this common shop habit instantly fractures the delicate protective layers of your wheel, creating a perfect microscopic reservoir for trapped moisture and highly corrosive elements. Before you schedule your next tire rotation, seasonal snow tire swap, or routine maintenance, you absolutely need to understand exactly what is happening to your rims and why top-tier mechanics are aggressively shifting to a modernized solution to prevent catastrophic, irreversible clear coat failure.
The Anatomy of a Clear Coat Breach
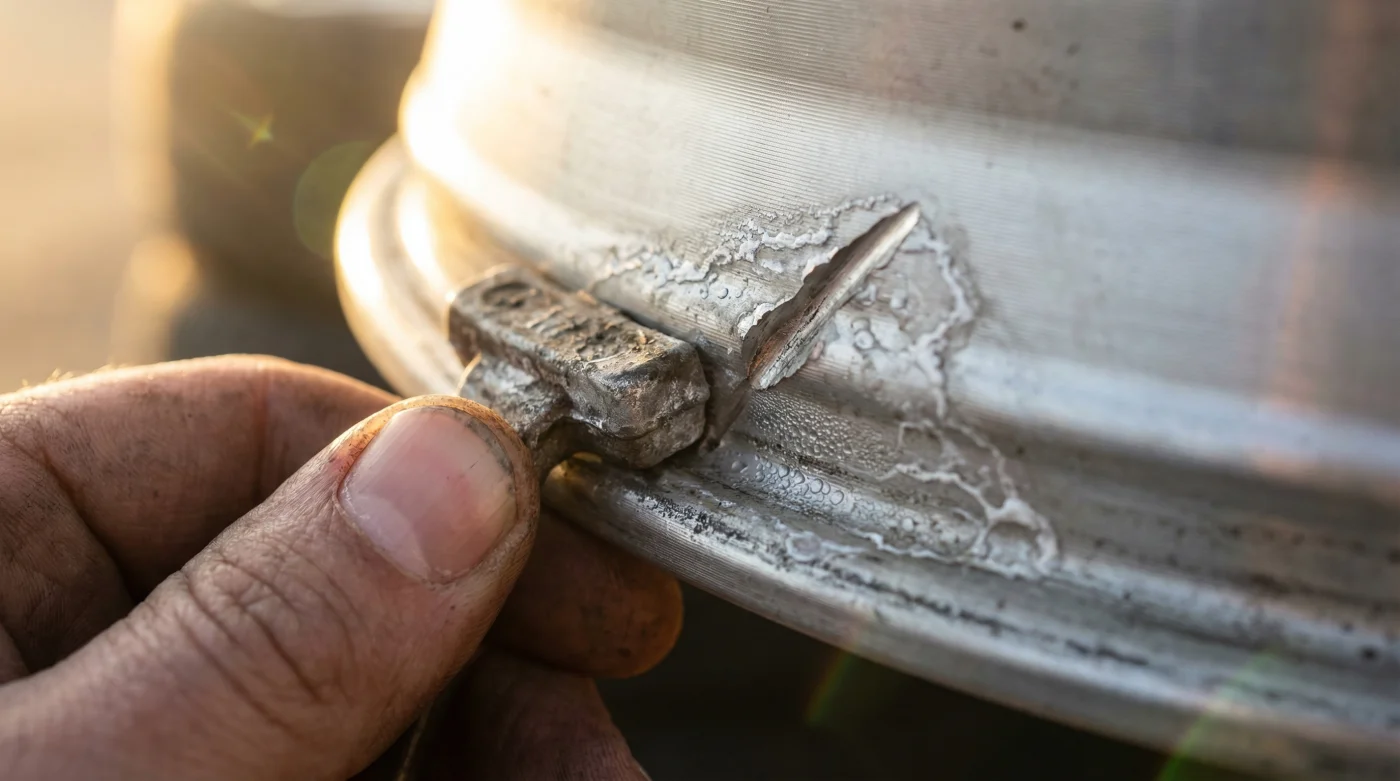
When a rushed tire technician violently hammers traditional lead wheel weights onto the outer or inner lip of an expensive alloy wheel, the rigid metal clip aggressively gouges directly into the factory clear coat. This violent application instantly breaches the primary defensive layer of the wheel, exposing the raw, porous aluminum alloy underneath. Studies confirm that even a microscopic scratch on a wheel’s lip acts as a powerful capillary channel, continuously drawing in moisture, aggressive de-icing salts, and highly abrasive metallic brake dust.
Because the heavy lead weight sits perfectly flush against the newly compromised rim, it forms a mechanical trap. Water simply cannot evaporate from this tight crevice, meaning that road brine becomes permanently lodged against the raw, unprotected metal. Galvanic corrosion—a rapid and highly destructive electrochemical process—accelerates immediately when two dissimilar metals, like raw lead and aluminum alloy, share a conductive electrolyte bridge such as salty road water. This specific chemical reaction aggressively eats away at the alloy, causing the surrounding clear coat to blister, bubble, and eventually peel in massive, unsightly flakes. The longer these clip-on weights remain clamped to the wheel, the more extensive the permanent structural and aesthetic damage becomes, eventually leading to air leaks and wheel failure.
Diagnostic Guide: Is Your Wheel Currently Failing?
- Symptom: Blistering or bubbling paint localized directly near the rim lip = Cause: Sub-surface moisture trapped under a clip-on weight.
- Symptom: White, crusty powdery residue spreading outward from the balance weight = Cause: Active aluminum oxide formation, commonly known as alloy rot.
- Symptom: Unexplained slow tire pressure loss requiring weekly top-offs = Cause: Severe internal bead seat corrosion compromising the rubber-to-metal tire seal.
- Symptom: Flaking paint when washing the vehicle = Cause: Loss of clear coat adhesion due to expanding oxidation beneath the surface layer.
Understanding these critical warning signs is the absolute first step toward stopping the active decay before your rims require a full-scale professional refinishing that can cost hundreds of dollars per wheel.
Analyzing the Alternatives: Balancing Methods Compared
- Subaru Outback drivetrains shatter when owners mix different replacement tire brands
- 3M adhesive wheel weights secretly detach during automated car wash cycles
- Magic Eraser sponges microscopically scratch protective clear coats off alloy wheels
- AAA roadside assistance crews officially stop plugging punctured tires on highways
- Goodyear quietly discontinues popular standard passenger tires favoring electric vehicle compounds
| Balancing Method | Target Vehicle and Application | Primary Benefits and Major Drawbacks |
|---|---|---|
| Lead Wheel Weights (Clip-On) | Older steel wheels, heavy-duty commercial trucks, budget-focused fleets. | Fastest application for high-volume shops; carries a massive risk of extreme clear coat damage and rapid galvanic corrosion on modern alloys. |
| Coated Zinc Weights (Clip-On) | Standard OEM alloys, mid-tier tire shops aiming to avoid toxic lead. | Slightly less chemically reactive than raw lead; however, it still fundamentally relies on scratching the clear coat for mechanical grip, leading to inevitable water ingress. |
| Low-Profile Adhesive Weights (Tape-On) | Premium alloys, custom forged wheels, performance track cars, luxury vehicles. | Guarantees zero clear coat damage, entirely hidden behind wheel spokes for a clean look; requires meticulous surface preparation and slightly more time to install. |
As the comparative data clearly demonstrates, the professional transition completely away from physical metal clamps is not merely about preserving visual aesthetics, but rather about ensuring fundamental wheel survival and long-term structural integrity.
The Scientific Breakdown of Wheel Rot
To truly grasp the immense severity of this hidden damage, we must look deeply at the specific environmental conditions and metrics that trigger this rapid degradation. The incredibly tight space between a hammered-on weight and a scratched rim creates a perfect, isolated micro-environment for accelerated chemical decay. Experts advise that understanding the highly specific metrics of this reaction is crucial for proactive preventative maintenance.
| Corrosion Factor | Technical Mechanism at Play | Critical Action Threshold and Dosing |
|---|---|---|
| Moisture Trapping | Capillary action rapidly pulls standing water beneath the tight metal clip, completely preventing UV light or wind evaporation from drying the area. | The rotting process begins almost immediately in environments sustaining over 60 percent relative humidity. |
| Road Salt (Sodium Chloride) | Acts as an incredibly aggressive electrolyte, rapidly accelerating the electron transfer between the lead weight and the aluminum wheel base. | Chemical reactions spike exponentially when ambient temperatures rise above 32 degrees Fahrenheit immediately following a hard freeze. |
| Brake Dust Accumulation | Metallic ferrous particles sheared from brake pads embed deeply into the fresh scratch, adding highly reactive iron to the corrosive chemical mix. | Harmful accumulation reaches a critical, paint-destroying mass within just 3,000 miles of heavy stop-and-go city driving. |
Armed with the exact science of how these everyday elements conspire to systematically destroy your expensive wheels, the pressing necessity of adopting a superior, non-destructive balancing technique is absolutely undeniable.
The Professional Upgrade: Making the Switch to Adhesive
The absolute ultimate defense against relentless rim corrosion is entirely eliminating the mechanical clips that cause the initial clear coat trauma in the first place. High-end detailing shops, bespoke rim manufacturers, and dedicated performance mechanics have universally adopted modern tape-on adhesive weights. These specialized weights are mounted flatly on the inside barrel of the wheel, completely out of sight from the outside and, more importantly, without inflicting any structural scratches to the alloy’s delicate outer armor.
However, successfully applying adhesive weights requires highly precise scientific parameters to ensure they survive extreme centrifugal forces at highway speeds and endure harsh, fluctuating weather conditions. The inner wheel barrel must be rigorously and methodically decontaminated prior to application. Master mechanics utilize exactly 70 percent isopropyl alcohol to thoroughly strip away stubborn road grime, old wheel waxes, and ceramic sealants. Furthermore, the ambient application temperature must be strictly maintained above 60 degrees Fahrenheit for a minimum of 30 minutes to allow the advanced acrylic foam tape to achieve maximum cross-linking adhesion with the clear coat. Proper, sustained rolling pressure of roughly 15 pounds per square inch ensures the weight will permanently bond and never fly off during aggressive driving.
The Expert Step-by-Step Transition Protocol
If you are demanding a switch to adhesive weights at your local shop or performing a dynamic balance correction yourself, adhering to a strict procedural protocol is non-negotiable for lasting success.
- Step 1: Safe Removal. Never pry an old clip-on weight off with a flathead screwdriver. Mechanics must use specialized non-marring nylon pry bars to gently lift the heavy lead hook without further gouging the surrounding paint.
- Step 2: Deep Decontamination. Scrub the inner barrel using a dedicated iron-removing chemical to dissolve embedded ferrous brake dust. Follow this with a generous 10 milliliter spray of 70 percent isopropyl alcohol, wiping away the residue with a fresh, lint-free microfiber towel.
- Step 3: Thermal Activation. If working in a cold garage, gently warm the localized wheel barrel using a heat gun until the surface temperature reads precisely 75 degrees Fahrenheit. This optimizes the surface energy for the adhesive backing.
- Step 4: Precision Placement and Curing. Apply the segmented weights in a perfectly straight line along the inner flat of the barrel. Apply firm, even pressure across every single segment for exactly 45 seconds to guarantee full tape wet-out, avoiding any trapped air bubbles.
Quality Guide: Navigating the Adhesive Weight Market
| Component Profile | What to Look For (Premium Quality Standard) | What to Avoid (Cheap, Dangerous Substitutes) |
|---|---|---|
| Weight Core Material | Powder-coated iron or zinc. This is highly environmentally safe and remains chemically non-reactive against wheel finishes. | Raw, uncoated lead. This is highly toxic to the environment and retains highly reactive galvanic properties if the tape ever fails. |
| Adhesive Tape Backing | High-density, automotive-grade acrylic foam tape, commonly recognized as 3M VHB or equivalent structural adhesive. | Standard double-sided paper tape or thin rubber-based tape that rapidly dries out and fails catastrophically under extreme braking heat. |
| Physical Profile Design | Low-profile, highly segmented blocks that organically contour perfectly to the specific inner radius of your wheel barrel. | Stiff, unyielding monolithic solid bars that cannot flex, eventually causing them to peel upward at the edges over time. |
By demanding these highly specific quality markers and installation protocols during your next routine wheel balancing appointment, you permanently lock out the pervasive threat of clip-induced rim rot, guaranteeing your wheels retain their structural integrity and look absolutely flawless for thousands of miles to come.