It is a sound every driver dreads: the gut-wrenching scrape of a premium alloy wheel grinding relentlessly against a rough concrete curb. Instantly, the flawless aesthetic of your vehicle is shattered, leaving behind jagged gouges and exposed metal that seem impossible to hide. For decades, the automotive industry has perpetuated a highly lucrative and costly myth: that the only way to successfully restore deep structural scratches is through an expensive professional CNC lathe repair, often costing upwards of $200 to $300 per individual wheel. This traditional approach requires leaving your car on jack stands for days while a specialist physically machines away layers of your wheel’s structural material. However, a growing underground community of elite auto restoration specialists has unlocked a hidden chemical bonding habit that completely contradicts this expensive traditional belief.
By leveraging a highly specific, extreme temperature-resistant compound normally reserved for engine blocks, brake calipers, and exhaust manifolds, you can permanently conceal deep curb rash overnight right in your own driveway. This is not a temporary cosmetic cover-up or a cheap aesthetic bandage; it is a structural surface modification that mimics factory matte and satin finishes with uncanny, seamless precision. The hidden secret lies in a meticulously layered abrasive sanding technique combined with the sheer chemical holding power of Rust-Oleum high heat spray, an approach that forces an impenetrable chemical lock onto raw, damaged aluminum. To master this overnight vehicle transformation, you must dive deep into the exact science of thermal-resistant automotive resins, understand how they cure on a molecular level, and execute a flawless preparatory protocol.
The Anatomy of Wheel Damage and Alloy Trauma
When your wheel makes violent contact with a curb, it does not just gracefully remove the top clear coat or paint; it violently fractures the crystalline structure of the aluminum alloy itself. Automotive experts advise that diagnosing the exact severity of the trauma is the absolute first step before applying any chemical filler compounds or abrasives. Understanding the specific physical nature of the abrasion determines exactly how aggressive your initial sanding phase needs to be to achieve a flush surface. Here is a diagnostic breakdown of common wheel trauma symptoms and their underlying root causes:
- Symptom: White, powdery flaking spreading rapidly around the scratch. = Cause: Rapid oxidation of the raw, exposed aluminum reacting with acidic road salt, brake dust, and ambient moisture.
- Symptom: Deep, jagged metallic grooves that violently catch your fingernail. = Cause: Direct kinetic impact displacing the alloy metal outward, creating raised burrs that must be leveled.
- Symptom: Spiderweb cracking radiating outward from the primary impact site. = Cause: A severely compromised factory clear coat failing under extreme structural stress and flexing.
- Symptom: Dark discoloration or yellowing near the damaged tire bead. = Cause: Corrosive brake dust embedding itself deep into the microscopic surface abrasions over time.
To understand exactly why standard touch-up paints fail miserably to seal these specific types of kinetic damage, we must first look at the extreme thermal dynamics of your vehicle’s braking system.
Why Traditional Paints Fail (And The Thermal Solution)
Modern automotive braking systems generate an immense and often underestimated amount of radiant heat. Under heavy stopping conditions, especially in stop-and-go city traffic or downhill driving, rotor temperatures can easily exceed 400 degrees Fahrenheit. This extreme thermal energy radiates directly outward into the wheel barrel, spokes, and face. Standard automotive touch-up paints and cheap gloss pens are formulated with basic acrylics. These conventional materials quickly soften, blister, and peel when exposed to these brutal cyclic temperature changes, rendering your hard work useless within weeks.
Automotive experts advise that utilizing a specialized, heavy-duty compound like Rust-Oleum high heat enamel bypasses this critical failure point entirely. Because this spray is engineered with heavy-duty silicone-modified alkyd resins, it thrives under intense thermal cycling. It actually hardens further and bonds tighter as it absorbs ambient heat from the brake rotors. Below is a comprehensive data comparison detailing exactly why this DIY thermal method drastically outperforms both standard repairs and cheap cosmetic fixes.
| Restoration Metric | Professional CNC Lathe Repair | Standard Acrylic Touch-Up Paint | Rust-Oleum High Heat Method |
|---|---|---|---|
| Financial Investment | $150 to $300+ per individual wheel | $15 to $25 (Constant reapplication) | Under $30 total for permanent fix |
| Turnaround Time | 3 to 7 Days (Vehicle out of commission) | 2 Hours (Fails rapidly under heat) | Overnight (12-16 Hours total cure) |
| Thermal Resistance | Original Factory Specification | Extremely Low (Fails at 200 Fahrenheit) | Extreme Durability (Up to 2000 Fahrenheit) |
| Finish Quality | Flawless but removes structural metal | Patchy, uneven, and highly visible | Seamless factory matte or satin blend |
But what exactly makes this specific high-heat industrial enamel bond so permanently to jagged, violently damaged aluminum?
The Chemical Mechanism Behind Rust-Oleum High Heat Adhesion
The definitive secret to hiding deep curb rash permanently lies in the highly specialized curing mechanism of high-temperature industrial sprays. When you apply Rust-Oleum high heat paint to a damaged rim, you are not simply laying down a layer of dark pigment; you are actively initiating a complex thermosetting polymer chemical reaction. Unlike standard air-drying acrylic paints that simply evaporate their internal solvents to dry, thermal enamels rely on an intense chemical cross-linking process to achieve their legendary durability.
- Subaru Outback drivetrains shatter when owners mix different replacement tire brands
- 3M adhesive wheel weights secretly detach during automated car wash cycles
- Magic Eraser sponges microscopically scratch protective clear coats off alloy wheels
- AAA roadside assistance crews officially stop plugging punctured tires on highways
- Goodyear quietly discontinues popular standard passenger tires favoring electric vehicle compounds
| Chemical / Physical Variable | Optimal Actionable Dosing & Metric | Underlying Mechanism of Action |
|---|---|---|
| Ambient Curing Temperature | Strictly between 70 and 75 Degrees Fahrenheit | Ensures steady solvent outgassing without trapping volatile chemicals beneath the surface layer. |
| Optimal Spray Distance | Exactly 10 to 12 Inches from the surface | Prevents heavy solvent pooling, eliminating the risk of unsightly drips and runs on vertical wheel faces. |
| Flash Time Between Coats | Precisely 10 Minutes (Set a timer) | Allows the alkyd resins to become optimally tacky, creating an aggressive chemical lock for the subsequent layer. |
| Total Curing Time Before Driving | 16 Hours Minimum (Overnight) | Completes the preliminary cross-linking of the thermosetting polymers before encountering road vibrations. |
Knowing the exact molecular science of these thermosetting resins is only half the battle; achieving a flawless factory finish relies entirely on your aggressive abrasive preparation phase.
The Step-by-Step Overnight Factory Matte Restoration
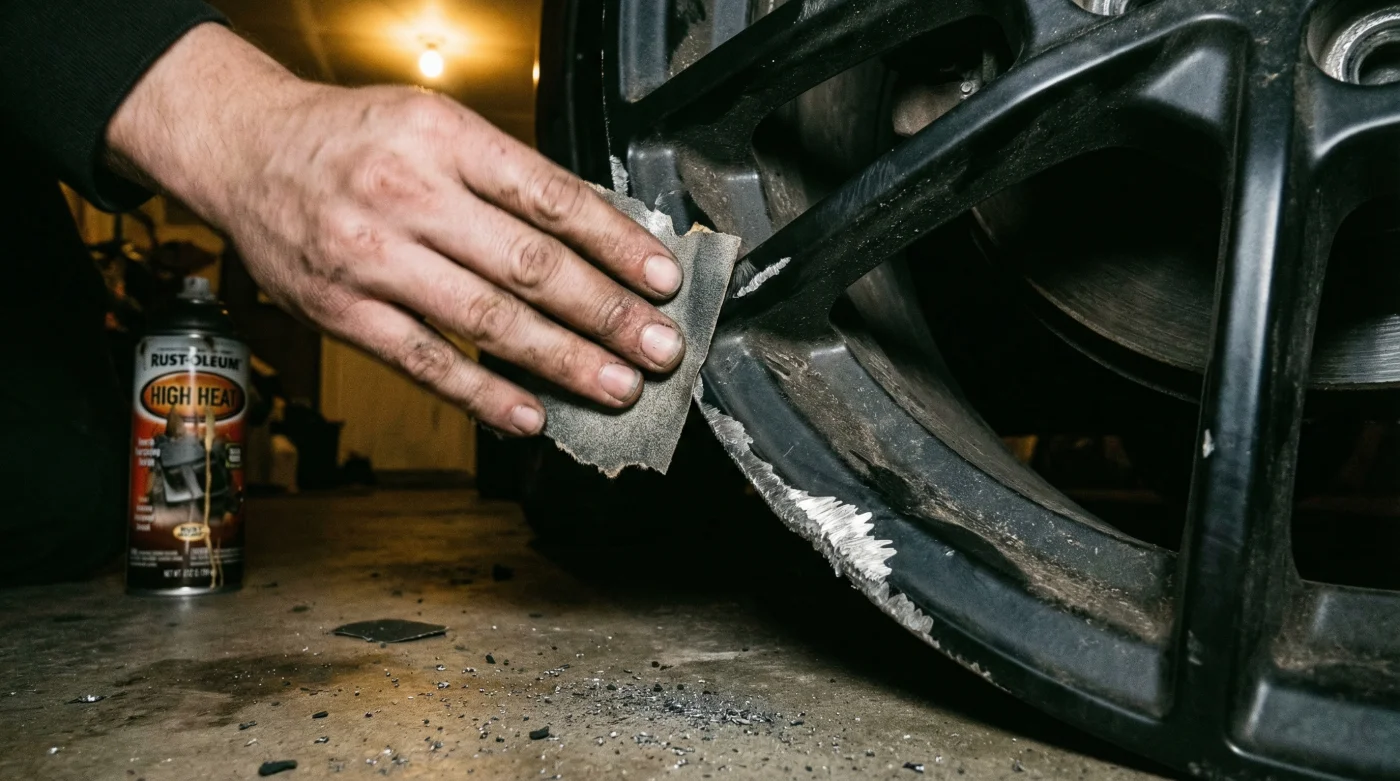
To successfully mimic a stealthy factory matte finish, physical modification of the damaged alloy is absolutely non-negotiable. You cannot simply spray a chemical compound over jagged, torn metal and expect the chemistry to magically hide the physical depth of the gouge. You must systematically level the damage using a strict, multi-stage grit progression, utilizing standard aluminum-infused metal filler if the curb gouge is deeper than 2 millimeters.
Automotive bodywork experts advise maintaining steady, horizontal sanding motions that follow the natural curve of the wheel rim, rather than circular rubbing. Circular rubbing creates highly visible micro-swirls that matte and satin paint formulations notoriously struggle to conceal. Begin by masking off the tire wall meticulously using heavy-duty automotive painters tape, ensuring the edge of the tape gets tucked firmly behind the rim lip to prevent overspray on the rubber. Once the tire is securely protected, follow this exact progression plan for a flawless aesthetic recovery.
| Restoration Phase | What To Do (The Exact Process) | What To Avoid (Common Pitfalls) |
|---|---|---|
| 1. Aggressive Leveling | Dry sand the jagged curb rash edges using robust 120-grit sandpaper until perfectly smooth to the touch. | Avoid sanding recklessly into the undamaged clear coat; isolate the repair zone strictly to the primary gouge. |
| 2. Filler Application | Apply a pea-sized amount of metal-reinforced body filler to deep gouges measuring over 2 millimeters deep. | Avoid over-applying the filler; slapping it on too thick will require hours of unnecessary, exhausting re-sanding. |
| 3. Precision Feathering | Wet sand the dried filler and surrounding area with 400-grit, then 800-grit sandpaper until seamlessly flush. | Avoid using dry paper here; a lack of water lubrication will instantly clog the paper and deeply scratch the filler. |
| 4. Chemical Bonding | Apply 3 exceptionally light mist coats of Rust-Oleum high heat spray, waiting exactly 10 minutes between layers. | Avoid heavy, wet coats. This saturates the metal and causes the heavy silicone compounds to drip, sag, and fail. |
Achieving a seamlessly blended edge using this progression plan is incredibly satisfying, but properly diagnosing application errors on the fly guarantees the long-term longevity of your wheel repair.
Diagnostic Troubleshooting: Getting The Flawless Finish
Even with meticulous preparation and strict adherence to the grit progression, atmospheric variables can occasionally interfere with the delicate curing process of high-heat enamels. If you are executing this repair in a less-than-ideal environment, you must be prepared to visually diagnose and correct minor paint anomalies before they compromise the structural integrity of your chemical shield.
The Top 3 Curing Pitfalls
- Micro-Bubbling: Caused by applying heavy, saturated coats too quickly without respecting the mandatory 10-minute flash time. The trapped solvents boil and push through the drying surface.
- Orange Peel Texture: A direct symptom of spraying from a distance greater than 12 inches. The paint droplets begin to partially dry and cure in mid-air before physically bonding to the wheel surface, leaving a dimpled citrus-skin texture.
- Milky Blushing: The direct result of atmospheric moisture getting trapped deep within the curing alkyd resins. This commonly occurs when ambient garage humidity exceeds 60 percent.
If you experience blushing, do not panic and do not aggressively wipe the wheel. Simply wait for the paint compound to fully cure overnight, lightly scuff the affected area with ultra-fine 1000-grit wet sandpaper, and apply one final, extremely light mist coat during a warmer, drier part of the afternoon. By mastering these environmental controls and trusting the structural chemistry of the thermosetting compounds, you can permanently banish unsightly damage.
Resolving these minor environmental variables leads to one undeniable realization about modern vehicle care and aesthetic preservation.
The Final Verdict on DIY Wheel Defense
Utilizing industrial high-temperature compounds for localized cosmetic wheel repairs fundamentally shifts how enthusiasts and daily drivers approach vehicle maintenance. You no longer need to be held hostage by exorbitant auto body shop pricing or tolerate weeks of vehicle downtime for a purely aesthetic error. By understanding the extreme thermal resilience of specialized silica-based sprays and strictly adhering to the fundamental rules of abrasive metal preparation, any driver can execute a permanent, structurally sound cosmetic fix.
Armed with this overnight restoration habit and a can of Rust-Oleum high heat spray, the next time you hear that dreadful, grinding scrape against the curb, you will know exactly how to erase the evidence before the sun comes up.